DIY Whitewashed Wood Pantry Door Hanger
How to turn an ugly duckling Goodwill find into a whitewashed wood hanging pantry door organizer using only craft paint
I’ve seen multiple tutorials about how to paint stuff using the “whitewashed wood” technique and it’s always intrigued me. It seems you can do it with just about anything and so when I found this ugly little duckling at my local Goodwill for 79 cents, I saw a crime of opportunity.

You guys should know I’m also all for a crime of opportunity by now. It’s the only reason our kitchen cabinets are painted.
I used brown craft paint I got for a hand full of cents at Hobby Lobby and then mixed it with a little bit of white because I didn’t want it super super dark. I was going for more of the whitewashed lighter wood look. I used a box top I got from a candle I got shipped to me to hold in the little pegs while I painted them. I put on one quick coat and it dried super quickly so I added another one. I was able to put 2 coats on during a single episode of Friends. Holla!

Once that was dried, I decided to try my hand at the dry brushing technique. If you’re like me and have seen it but never tried it or don’t even know what it is, you basically dip the VERY ENDS of your bristles of a paintbrush in white paint and basically wipe every bit of it off on a paper towel or something like that.

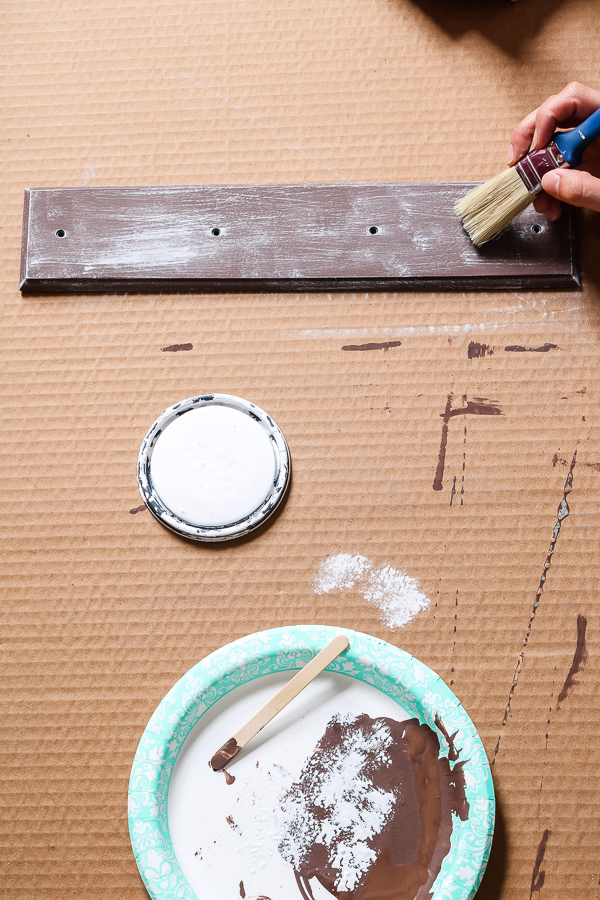
You can see on the far left, I didn’t quite wipe enough off on the first pass. Whoops. It’s fine. Makes it look less perfect. Much like myself. All I had left to do was the little pegs. Peggys, as I called them lovingly throughout this project.

That’s it! It was so easy! I was also super pumped about my first foray into this dry brushing technique thing and was even more excited that I was able to do the whitewashed wood using only craft paint! I searched high and low for a tutorial with it and everyone uses chalk paint or regular paint and I just didn’t have that and didn’t want to go buy any for this. Just a perfect lesson in using what you have so you don’t have to spend any money.


This project cost me a grand total of 79 cents! For a DIY hanging pantry door organizer, I gotta say I’m pretty pleased! I had everything else I needed on hand. I would say I’m pretty pleased with how this little guy turned out. What do y’all think??


Wow! What a transformation! I had no idea that painting technique was so easy. I can’t wait to try it!
I was honestly SO SCARED of doing it, but am SO IMPRESSED with how easy it really is! I’ll definitely be doing it again!
This turned out so cute!! Bye bye ducks!!
haha, until we meet again, quackers ;P
Perfect and you can’t beat the price either.
girl I know that’s right!
You did a great job Carmen! I absolutely LOVE the dry brushing technique and do it to just about every project that I do! I maaaay have a slight addiction to it haha.
thank you!! and let me tell you, now knowing how easy it was, I’m going to be doing the same thing! 😉
Such a great little makeover. Looks perfect now!
you’re so kind! thank you!!
What a cute little find. The dry brushing looks great. I have never tried it, but I love the look of it. I also like to name my projects as I work. Perfect!
I totally think you should try it! It’s so fun!
You did an awesome job on this little project! I love how pretty it looks with your door.
Angie, you’re so sweet! thank you!!