Shared Girls’ Room Accent Wall
Sharing how to create a nursery accent wall or in our case an accent wall in our girls’ room with wallpaper and simple board and batten!
It feels like everything is draaaggggggging in the girls’ room because things are out of stock or on backorder or you order curtains thinking there’s both panels in a bag only to find out it’s only 1.
Or you finally find a crib you like since the one you really wanted went up in price and it had rust on it when it got delivered so you have to wait for a new one.
*deep breath*

In case you’ve forgotten or you’re just new here, this is the design we are hoping for and in this post we talked about our shared girls’ room design plans in full detail.
Quite frankly, the entire room was designed around my desire for wanting a dark green paint color on an accent wall and this peel and stick floral wallpaper from Rocky Mountain Decals. Using this color scheme, I knew I wanted a board and batten accent wall and the wallpaper on the top part.
If you’re curious how to create something similar to design your nursery or just a bit of nursery inspiration, hopefully this post will help!
Shared Girls’ Room/Nursery Accent Wall
This post may contain affiliate links which help me pay for things like web hosting, site security, email services and bottles of wine from Aldi when the aforementioned things aren’t working. They cost nothing for you, but help me continue to provide free content to you fine, beautiful people!
- primed MDF for the “board”
- primed MDF for the “batten”
- Paint color of your choice (We used Behr Black Bamboo)
- Nail gun (we used our favorite Ryobi nail gun here)
- Level
- Measuring tape
- Stud finder
- Wood filler
- Caulk
Installing Board and Batten

We haven’t really shown a lot of Charlotte’s room because aside from this diagonal feature wall, there wasn’t a lot to write home about.
Our first step when adding board and batten was to remove the existing baseboard because it had a rounded top and we needed it squared off so we had to go buy a different type of pre-primed MDF.


After we found the studs, we installed the new 6″ pre-primed MDF baseboard.
We have actually done a board and batten tutorial after installing it in our hallway, but I wanted this a little different.

I am absolutely in love with the headboards we scored from Facebook marketplace, but wanted to make sure that the board and batten was a bit above them so it would pop against the dark green wall.


Once you determine how far you want your board and batten to be on your wall, you’ll want to add a level line all the way across.
This will be where you attach your horizontal board.
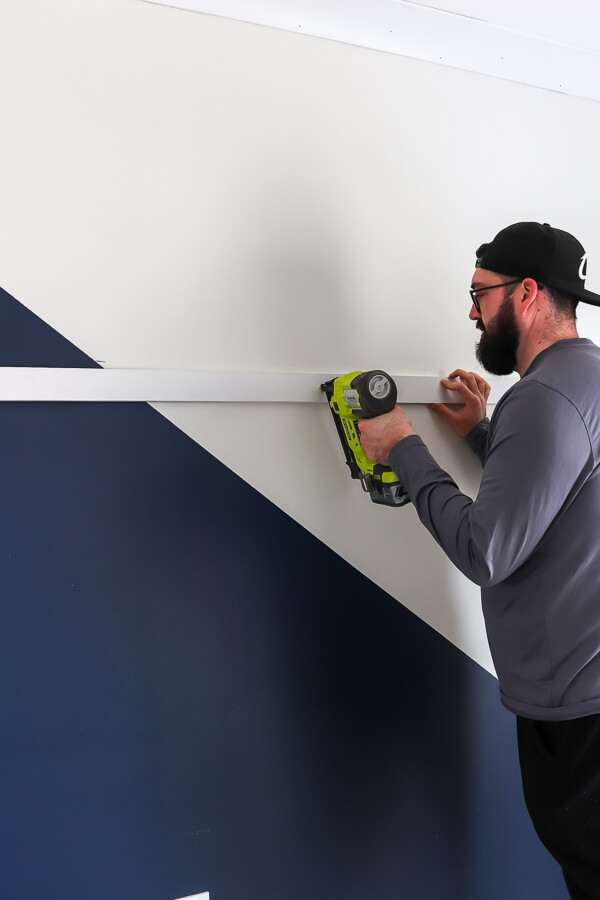
Here’s a little hack if you’re installing board and batten to create an accent wall for yourself:
Put a couple nails in the center of the board on a stud. That way you can have it somewhat “anchored” and can pivot it up and down to make sure it is level all the way across.


Using your level, add nails all the way across your board, making sure you’re placing nails in the studs so it’s solid in your wall.
Alternatively, you could just glue it to your wall, but we prefer nails.
Mainly so I can say things like, “NAILED IT!” after every nail we put in.

Regardless of the spacing of your batten, you’ll want to frame out your wall to give the wall a finished look.
Add a piece of batten in both the left and right corner and secure with a nail gun. It’s also important for this step because even if you have a new construction home, chances are your corners may not be exactly 90 degrees so you’ll want to use a level in this step to make sure your batten is straight.
Since this will be painted, you can fill any gaps between your MDF and your wall with caulk and paint over it. It’s what we did!

I knew I wanted the board and batten in this soon-to-be big girl and baby room a little more “feminine” which meant in my mind I wanted the batten closer together.
Based on math and the total width of our wall, we determined for us, our batten would be spaced 12 inches apart. More like 12 1/4″ to make sure we could evenly space them.
You can make your width as wide or narrow as you want, this just may change the amount of boards you need.


Once the board and batten was nailed up, then comes the least fun part of this process – filling nail holes.
BOOOOOO.


A pro tip for using wood filler: When joining wood with wood (as in the cracks between the horizontal board and the vertical batten like in this picture), use wood filler.
When you’re trying to join wood to the wall (as in the cracks on the side of each vertical batten), that’s where you would use caulk.
Installing Removable Wallpaper

Holy. Gucamole. Pepperoni. Tony.
Seeing this Queen Ann removable wallpaper from Rocky Mountain Decals in person made me fall in love with it even more than I did seeing it on their website. Especially after looking through what felt like 1.6 billion wallpaper designs.
Polka dots. Stripes. Animals. Murals.
I knew I wanted floral, but even then there were so many options.

I’ve never painted a wall so fast in my entire life.
Shameless (unsponsored) plug: The Behr Marquee line of paint is amazing. The coverage in just one coat is almost full coverage and once the second coat is added, there’s a 0% chance you’ll need to add more.
We used it in our main closet makeover and fell in love.


I did throw on a coat of primer on the top where the navy diagonal was just in case the wallpaper was somewhat see through but it’s so think I think I could have done without that.
Typically when it comes to wallpaper that comes in rolls, you want to start by installing in the center of the wall so that if your walls aren’t 90 degrees in the corners you won’t run the risk of things getting unlevel.

However, this particular floral wallpaper comes in sheets which was a first for me.
When you order it, you measure the width and height of your wall and they determine how many rolls you need.

After every sheet I would install, I would get off the step ladder and just look at it and talk about how much I loved it.


We were left with a TAD bit of wallpaper and I’m hoping it may be enough to put in her drawers when it’s time to redo her closet (if Ikea would ever keep the dresser we need for their closet in stock).

Oh. Yep. I finally did it. I caved and bought her Beddy’s bedding.
I had such a hard time pulling the trigger on this because of the price, but so far she loves it. She is so excited that she gets to sleep “in a sleeping bag on her bed” and (don’t tell her I said this) but has been also making her bed *without me asking* since we put it on.
I should have gotten this sooner. Especially since she had a daybed and I hated every second of changing her bedding.

Regardless, I’m so stoked with how this room is shaping up.
At least this side – ha!
When it comes to the other side where a crib needs to be, well …. that’s still TBD.
What I love is that because of this feature wall, I feel less pressure to have a ton of “nursery decor” or even wall decor in general. I feel like a wall like this is also prime to grow with your child/children.
AKA. Hopefully aside from changing out the crib in a couple years, I won’t have to do TOO much in this kids’ room for a long time!


