6 Popular Tile Patterns For Your Home


If you’re thinking about adding tile to your home, choosing a tile pattern can actually be more difficult than you think. Here are 6 different tile patterns you can put in your home that will work for either walls or floors!

Lemme let y’all in on a little secret – we hate installing tile. Like totally hate it.
And by we I mean J, obviously.

I’ve never installed tile, but I’ve helped and every time it’s been a nightmare. It’s super finicky stuff and lots of things have to go right for it to look good or else it will look like we let Josiah and Charlotte up in there and installed it.
We have actually learned a lot since installing our very first tile which was the floor in our guest bathroom. While we are by no means professional tile layers at this point, I would like to share with you some of the most popular tile layouts that will work with most tile you choose, from classic to farmhouse to sleek and modern.
6 Classic Rectangle Tile Layout Patterns
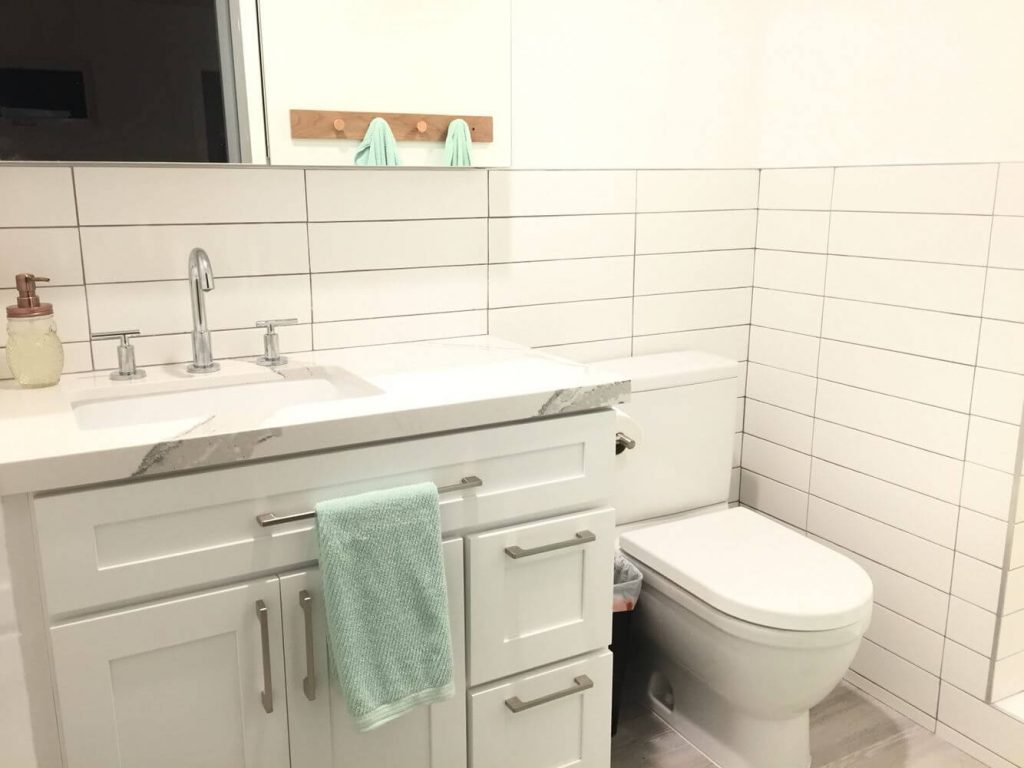
1. Brick Lay Pattern

I mean, duh, right? Subway tiles are probably the most popular tiles you can have.
You typically lay subway tile in a brick lay pattern, but these aren’t the only type of tiles that you can lay this way.

In our master bathroom refresh that we did last year, we got these incredible 12×24 marble look peel and stick tiles that we laid in this pattern.
You can buy these in sheets so that they go up quicker, but actually subway ceramic tiles themselves are usually very inexpensive.
2. Straight Lay
I think laying tile in a straight lay pattern looks very much like shiplap which lends itself to farmhouse style in my humble lil’ opinion.
I think you could probably use subway size tile to create a look like this, but quite honestly, it’s going to look best if you use tile that’s longer than it is tall.
Typical subway tile size is 3×6, but if you’re wanting to do a straight lay tile pattern, I would go with a tile that’s more along the size of at least 12 or 18 inches long.
3. Herringbone

Herringbone to me is a fancy word for zig zag, but whatever. It’s gorgeous.
We have a shower niche that we laid the same subway tile that was in the rest of our guest bathroom in a herringbone pattern and I love it.
The reason a herringbone pattern is so versatile is because you can use basically any kind of rectangle tile that you want for a different look. This can work as either a gorgeous floor pattern or wall tile.

I love this backsplash from Mr. Build it and Mrs. Style It. It’s simple, with darker grout lines and it’s gorgeous.


This marble floor and this wood look tile both laid in a herringbone pattern can show you how different of a feel you can have with herringbone floors. The one on the left with marble feels more luxurious and spa-like and the one with the wood look tile gives you all the farmhouse decor vibes!
4. Vertical Stack Bond
The name is bond. Stack Bond.
Not sorry. I had to.
I honestly had never even heard of this until I started researching tile layouts, but this was a unique one!
Think straight lay, but vertical.

I think what they did in this bathroom is so sleek. Clean and modern, but not too busy at all. They actually did the same thing in the shower but with maroon tile; super bold and not sure I have the balls to do it, but it looks great in the design!

If you’re more of the dark and moody type, this vertical bone tile pattern is stunning.
5. Cross Hatch / Basketweave
This is one that had to grow on me, quite honestly but the more I saw it in rooms, the more I fell in love with it! I mean just look:

When I first saw it, it seemed like it was just a bit too busy or would make me sick to look at, but seeing a cross hatch tile pattern in this bathroom completely changed my mind.
6. Third Step (1/3 Step)
This one was a little more confusing to my eyes and we have not done this method in our own home, but it’s pretty popular on the internet.
Instead of doing a brick lay tile pattern where you alternate every other row lining up with one another splitting the tiles in half, you actually split the tiles in thirds and line it up every third row. Confused yet? Sorry.
Here’s how Bob Vila describes it:
“Here, each tile joint is offset by 33 percent of the length of the tile below to evoke the illusion of diagonal lines rather than the vertical lines that appear in 50-percent offset. This pattern is particularly suited to tiles 18 inches or longer.”
Bob Vila

Norma at The House That Will actually did a great tutorial about how to install third stack tile if you’re liking this look!
If you really want your mind blown, there are variations to most of these tile patterns.
Take herringbone for example. Not only is there herringbone, but there’s diagonal herringbone or 45-degree angled herringbone or even 90-degree angled herringbone.
I could go on about tile patterns for hours, but I know none of y’all would read that and if you’re like me, you’d be hella overwhelmed which I’m also not trying to do.
If we ever decide to lay tile ourselves again (which is likely since we have at least one more bathroom and a kitchen that will need it one day), I may try to remember to do a full tutorial on how to install tile yourself, but until then, I didn’t want to leave you hanging without sharing some tips we’ve learned along the way.
Top DIY Tile Installation Tips
Never trust the corners of your room
It doesn’t matter if you live in a brand new construction home or an older home like ours, your walls are very likely not going to be straight. They’re hung by humans, after all.

This means when you’re hanging tile yourself, always start at the center of your room if you’re doing a full tiled wall.
Well, center of your calls I guess I should say. Measure and mark the center point of your wall both horizontally and vertically so that you know where they cross.
Set your tiles

They make tools that you can use to to set your tile, but when we installed tile in our laundry room, we discovered the trick of using a rubber mallet and an extra piece of hardwood floor that we had laying around.
I mean, when your 9″ unfinished oak hardwood floors were 33 cents a square foot, you can spare a lil’ piece.


