Restoration Hardware Inspired Dining Table


Create your own Restoration Hardware inspired rustic dining table in a weekend following our step by step woodworking plans and save yourself thousands of dollars
For other money saving DIY projects, check out our West Elm inspired curtain rods or our inexpensive mailbox makeover.

If you’re looking for PDF plans for this table, you can click here to jump straight to those!
You don’t see a ton of kitchen photos on this blog and it’s mostly because I don’t love it because I see so much I want to change, but also because I’ve never loved our kitchen table. Don’t get me wrong, I liked it and it was perfect for our old house which was way more cookie cutter and our dining area needed a high top table. But it just didn’t feel right in this house that had lower ceilings and just a different feel altogether.
I know it sounds crazy, but I’ve just always wanted a huge rustic dining table. Which is cool and all except in this house, we don’t have an actual dining room so it’s gotta be smack dab in the middle of our kitchen. It also didn’t necessarily have to be farmhouse dining table. I mean, I woulda been cool with a live edge table with hairpin legs or something super sweet, but lo and behold, a DIY farmhouse style table is what we’ve gotten ourselves into.
In case you’re wondering, here’s all the DIY projects we’ve done in this kitchen since we lived here:


If you’ve done a Google or Pinterest search recently on DIY farmhouse table plans or even just a farmhouse kitchen table in general, there are THOUSANDS. Not exaggerating at all. The only problem was all the plans I found there was just at least one or two things I didn’t necessarily love about them.
So, what do you do when that happens?
Force your poor hardworking husband to build you one exactly to your liking based off a picture of a little FOUR THOUSAND DOLLAR ONE from Restoration Hardware.
FOUR THOUSAND DOLLARS?!?! Ain’t nothing gonna be sat on and covered in crumbs and spilled drinks for $4000 in this house. Nah dawg. So, want to know how much we spent on ours? Don’t worry, I’ll share that a little bit later.
Restoration Hardware Inspired Rustic Dining Table Plans

Warning: This post will be extremely picture heavy and include lots of numbers because I am going to attempt to give you the actual plans of what we (Jordan) created.
Second warning: While we have since created step by step PDF plans for you, he did NOT actually have plans, so while I’m telling you that you can build your own modern rustic dining table in a weekend, it took us three weekends because he had ZERO plans and did this all in his head. And he’s never done this before. I know. He’s a genius. Somebody get Ana White on the horn.

We also made a matching bench I’m going to include as well, but if you don’t want to do the bench, of course you’ll just omit the wood needed for that part. Our table is 86x40x30 and our bench is 57.5x14x18. That means all our cuts and list reflect that because we wanted places to seat at least 8 people.
DIY DINING TABLE PLANS + BENCH LUMBER LIST
*Some affiliate links may be used for your convenience.
CUT LIST
For the farmhouse table plan:
**Note: If you see lines like \ or / that is my way of trying to denote the direction of your 45 degree angle you’ll be cutting.**
- 4x4x8 (x 4)
- 2×56” (center span supports)
- 2×29” double // 45* (center diagonal supports)
- 2×20.25” (vertical of X end)
- 8×13.25” double / \ 45* (diagonal X end)
- 1x6x12 (x 1)
- 4 x 28 1/8” ripped both edges off to 5”w (top/bottom of X)
- 4 x 5” ripped both edges off to 5”w (feet)
- 2x6x12 (x 2)
- 4 x 34” double / \ 45* – ripped both edges off to 5”w (top/bottom of X)
- 4 x 31” double / \ 45* – ripped both edges off to 5”w (top/bottom of X)
- 2x3x8 (x 1)
- 2 x 34” double / \ 45* – ripped both edges off to 2 1/8”w (breadboard support)
- 2x10x8 (x 3)
- 3 x 68” ripped both edges off to 8”w (tabletop)
- 2x10x12 (x 2)
- 2 x 68” ripped ONE edge off to 8”w (tabletop)
- 2 x 40” ripped ONE edge off to 9”w (tabletop breadboards)
For the Farmhouse Bench:
- 2x8x12 (x 1)
- 2 x 57.5” ripped ONE edge off to 7”w (top of bench)
- 1x4x8 (furring strip) (x 1)
- 4 x 10” ripped both edges off to 3”w (top/bottom of X)
- 4 x 3” ripped both edges off to 3”w (feet)
- 2x4x93” (stud) (x 1)
- 4 x 13” ripped both edges off to 3”w (top/bottom of X)
- 2x3x8 (x 3)
- 2 x 11.25” (center of X)
- 8 x 5 1/8” double / \ 45* (diagonal X end)
- 2 x 47 1/8” (center span supports)
- 2 x 19” double // 45* (center diagonal supports)
We have ZERO cell service in our local “house of wood” store. (That’s what we call Home Depot and Lowes around here since it’s usually all we go for lolz).
If you’d rather me send you a PDF printable version of this free cut list, click the photo below and tell me where to send it!
PDF Printable Wood Cut List

If you’re more of a visual person, we FINALLY created PDF plans for this table!!!! HOORAY! Click below and get your own! These plans vary a bit from the post because after creating several of these, Jordan perfected the process!
Full PDF Table + Bench Plans

STEP BY STEP TO CREATING YOUR RESTORATION HARDWARE RUSTIC DINING ROOM TABLE


This will seem like a lot of steps and it is, but overall, this is a real simple design.
First step to building a farmhouse table of course is making your cuts. You can cut as you go or choose to cut as you need the pieces. Totally your call. He of course cut as he went because we had no plans here.

Next lay out your wood and measure the width of your table top so you know how big the bread boards need to be at the end. Did you guys know the things at the end of these tables was called a bread board? I did not.
I also do not know why they’re called that unless they’re meant to like only cut bread on them. Which doesn’t fit into my keto lifestyle, but ya girl still LOVES and treasures all that is bread.

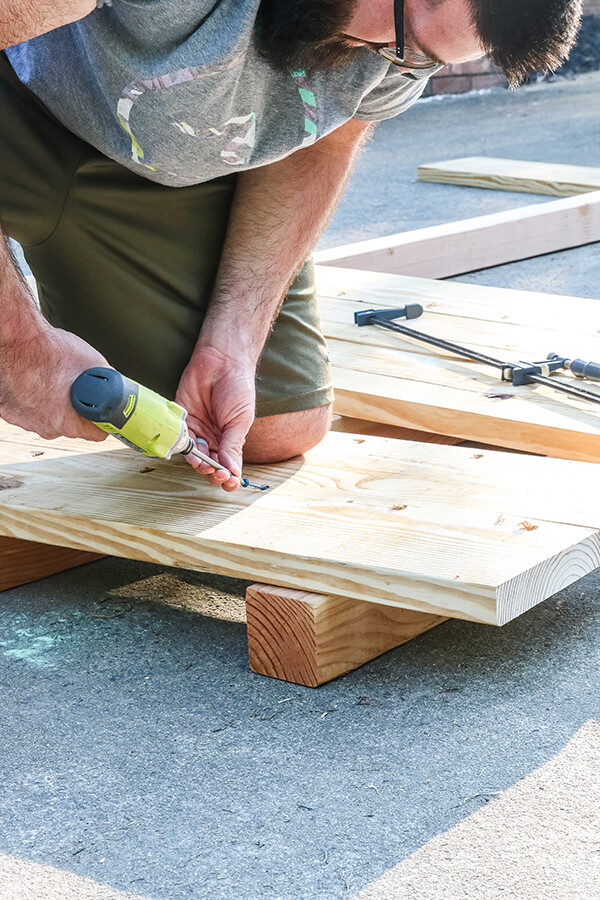
Next you will need to drill pocket screws in your boards you’ll use for your tabletop because you don’t want screw holes in the top of your table. I mean, okay, maybe *you* do but we did not. So, pocket holes it is. We have a knockoff Kreg Jig that we got from Harbor Freight and it’s a fraction of the cost and works just as good! Great option if you need pocket holes but don’t want to invest in a Kreg Jig just yet.
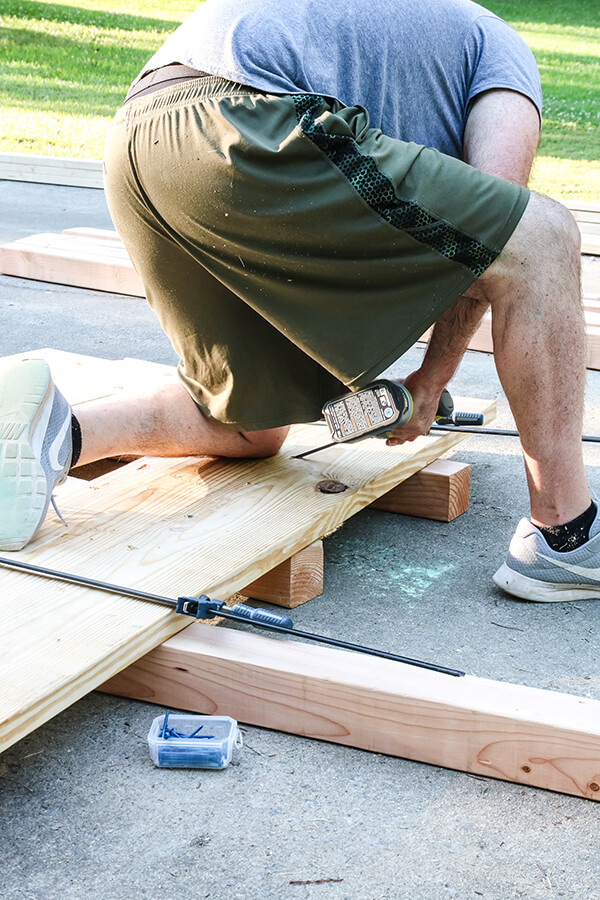
Using super huge clamps, clamp 2 pieces of your wood together and screw them together. Hey, nice butt, J! Just kidding, he doesn’t have a butt. Just legs that go all the way up to his back. I digress.


Our table was 5 pieces of 2×10. He drilled 2 of them together for one side and then another 2, and then screwed the middle piece last. Oh, and a fun little pro tip? If you don’t have clamps that go around the pieces of wood, you can use ratchet tie downs to hold everything tightly together while you work. Works like a charm!

Next it’s time to start building the supports for your legs. This 2×6 will be part of the leg but attaching this to your table helps keep your tabletop in place and kind of straightens it out a bit if you have any wonky pieces of wood. And boy did we ever.


Once your legs are fully assembled, then you can attach your lower support beam so that your two legs will connect.

If you’re creating a bench for your farmhouse kitchen table, then these are the pieces for the legs of the bench before Jordan screwed them together. You’ll assemble it the same way the table legs were assembled and the bench will be made of 2x8x12 cut into 2 pieces.


You will then of course sand every surface and stain it your color of choice. We used our favorite that we used in our guest bathroom shelves which is Minwax in Early American.
Oh, and don’t forget – use wood conditioner before your stain. Please. I promise you you’ll thank me.


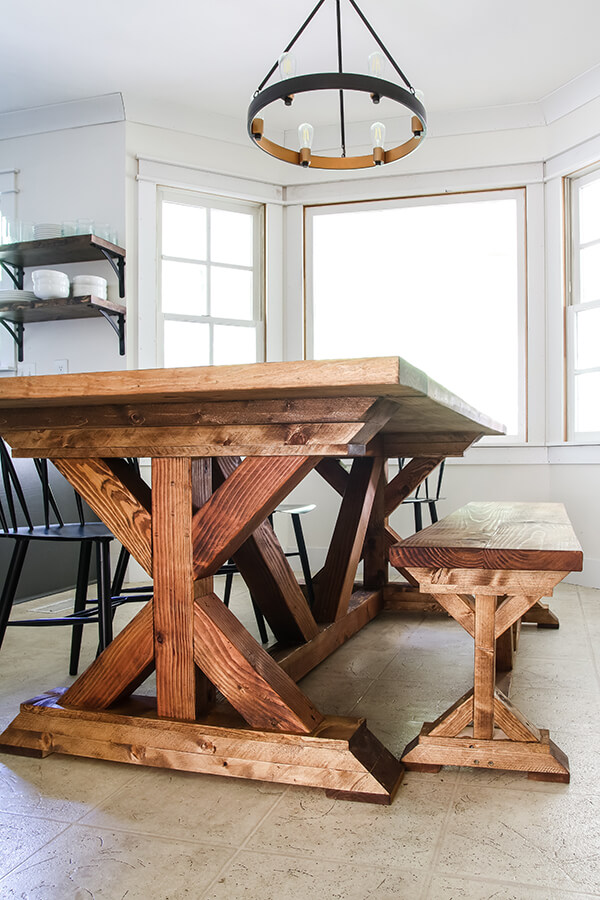


I literally just can’t get over it. I really can’t. It’s everything I wanted and not only that, ready for how much we actually paid for all of this??
UNDER $150!!!!!
That’s right. $136.71 + tax to be exact. You can build this table – a SOLID WOOD RUSTING DINING TABLE mind you – for under $150! If you try to take a look at dining tables even at Walmart, you can’t get a solid wood one for $150.
I don’t do math, but that is well over $3700 in SAVINGS!!! Are you kidding me? Not to mention, yes the table itself was $4000 but the bench was AN ADDITIONAL $1500! Unreal. I would NEVER pay that for a table. EVER. Do you hear me? If I do, you have my permission to stop reading my blog altogether.


I can PROMISE YOU you will want to pin this for later so make sure you click the image below and get in on this goodness!


What kind of wood did you guys use?
Pine! 🙂
Hi
Just purchased the plans for the table, but I wasn’t able to save or print. Would it be possible to email? I have proof of purchase, if you need it.
Thank you,
Jacob
Hi Jacob, I sent you an Email. You should have gotten it from the other site. Let me know if you’re still having trouble.
GORGEOUS!!! I want to build this but in a 12-foot by 4-foot. Do you think the plans that are in the works will provide for various sizes? Thanks so much for sharing your project! Looking forward to your next one 😉
Thank you so much! So we finally had plans created (you can get them here!) and you can always adapt your table to 12×4. It will just involve a little math, but should be very straight forward.
Was curious to see how to get the full plans for this table? After looking at 100’s of DIY Farmhouse tables, my wife and I have fallen in love with your design. I’ve already purchased all of the wood ($235.49). With a possible one or two modifications to the positioning of the legs to allow for more leg room. I looked up and down your post on Pinterest and did not see an area to sign up for email as you stated to one person in your comments. How may I receive to full plans on assembling this table?
Hey Barry! We have FINALLY had these plans completed and you can get them here!
Hi, I love this table and am trying to build it for our new home! I saw that you mentioned generating plans a couple months back and was hoping that they may be available by now?! Fingers crossed!
I actually FINALLY found someone to do them and he’s working on them as we speak!! I’m SO EXCITED! Make sure you’re on the email list because I’m going to send a blast out with them because I’ve had a TON of people asking for them! 🙂
Thank you for sharing how you (and your husband) built this table and bench. I just built this following your plans the best I could with a few minor changes for my son and daughter-in-law. We built the table and two benches that ended up being 84″ long each to allow for more seating. We totaled up the receipts and we ended up spending $484.04 including all wood, wood glue, sand paper, wood filler, plugs, stain and poly, stain rags, paint brush, screws, and large lag bolts. I already had a Kreg Jig, all saws. sander, drill, impact driver, and a few large clamps. I just wanted to share what it cost me. My wife and I worked on this for 11 days. It was a lot of work, but it turned out absolutely beautiful. If you are a more experienced woodworker, it would likely not take as long.
Thank you SO MUCH for sharing this information. That is SO helpful! I’m pumped you were able to build this and customize it to fit your family’s needs! HOORAY! I am with you – it was definitely a lot of work on our end too, but it is worth it and really can save you money if you’re willing to give it a shot 🙂
Where do the people sitting at the ends of the table put their legs?
Given the table leg is 3 inches in front when the chair seat ends when positioned at a proper reaching distance from the table top. Looks as though the table legs are closer together on the original RH model.
Looks great otherwise!
What do you mean ripped off both edges to 5″ w? You have put that on a couple of the cuts. Also is the 45 degree cut measurement measured from the long side or short side?
If you want all the detailed PDF plans, we finally got them made up! WOO! You can get yours here!
Do you live in an alternate universe where wood cost 10 cents? also consider rewriting this whole thing, you left out so many details, some answered in comments. Cant say enough how poorly written this was.
Oh cool, Dan! Thanks for being so uplifting and positive! It’s super helpful and I promise I’ll make sure that you are the first person I think of the next time I write anything on MY OWN SITE. Can’t say enough how poorly thought out your comment was.
What type of wood was used?
We finally have full PDF plans for this table available and you can see all details here!
How were the breadboard supports attached I don’t see them in the photos?
We used pocket hole screws! Drill a kreg hole in the table and screw into the breadboard. Hope that helps!
How are the 2-1/8″ bread board supports attached? I don’t see them on the top side or underside of your table photos. Were those left off?
I have the same question. Everything else is perfectly clear.
Fantastic Build. Hope I can do likewise! I’m just getting into woodworking. Thanks a bunch for the share. Snookumns 45.
What tools did you use to build this table and bench?
Miter saw, table saw, impact driver, kreg jig/screws, drill … I think that’s it! Hope that helps you.
I love this! What tools did you use when making the table? I want to make this, but need to buy tools.
Hello! I was wondering if you used the mini wax early American semi transparent or the regular? Thank you!
We used the regular!
What kind of wood was used for this? Is it pine?
Yes, it’s pine!
Turned out great, my first big DIY project and I got a couple jobs out of it too!
Love to hear that! Awesome!
Can you tell me the height of the table legs? Thanks!
After far too long, we finally had some plans drawn up and you can find them with much more details here!
Love this table and we are in middle of building it. How did you build and attach the legs for the table and bench? What size screws for these?
Any size screw between 4-5″ will work for you!
Quick question.. after using wood conditioner and stain, did you put any protectant over the wood, like polyurethane or anything? Thanks! My husband is making this tomorrow 🙂
Sorry for my delay, but yes! We used matte poly! Triple Thick is our favorite.
I would love the plans for this table it is absolutely stunning
Thanks so much!
Thanks for dimensions of the table pieces, but what are the lenths for each piece you used for the table? Can yu add that so that its clearer. Thanks in advance. Table looks great.
Currently working on a designer actually create real woodworking plans with cut lists and step by step instructions. Coming soooonnnn!!!
Thank you so much for posting this!!! My dad and husband just made this for me and I absolutely love it!!!
YAY!!! So happy!
Could you give me a list of the tools you used to make this table? Saws and everything? My stepdad can build just about anything, but I need to give him a list of what tools he would have to use.
We used a table saw, miter saw, kreg jig/screws, impact driver and drill. I think that’s it!
Beautiful table! Do you have the plans for the table?
I don’t currently have actual plans, but I’ve got something in the works! 🙂
This table is awesome! Is there anyway you could send Me the plans for the 6 ft table? We’re going to make this table tomorrow fingers crossed!!
Ah, I’m so sorry! We don’t have plans for any other than this! I should probably get my husband to sit down with me and make me some because we get that question a lot. This project was just so fly by the seat of our pants that we had no plans when we made it!
Hi Carmen!!! I love your table and bench. It’s just beautiful!! I was wondering could you send just the info on Howe’s to bold the legs??
How to build just the legs that is.
Hey Diana! Thank you so much!! We don’t have plans JUST for the legs, but I will see if maybe my husband can come up with some 🙂
I absolutely love this table! What is the name of the stain color you used on this? Thanks!
It’s in the post! Minwax Early American. One of our favorites!!
What size screws did you use
2 1/2″ pocket screws!
Hi! This looks amazing! I’m getting ready to try and build it, but had a quick question- what kind of saw is that he’s using?
Thanks for sharing and doing all the work putting it up for other to build!
You’re so welcome! Do you mean the brand or what kind of saw is that? He has a DeWalt 12″ sliding compound miter saw and a Rigid table saw. Those are the 2 that we used! Hope that helps!
I absolutely love this table!! It is so beautiful!! I am currently adding it to my covid-19 honey build it list!! I may have missed it but what size screws did you guys use???
Thank you!!! I’m not sure if we said but 2 1/2″!
Can you send the cut for a 6 ft table? I love this table!
Hey you guys rock!!
Quick question would you be able to send me the dimensions for the tressle, but i need them to be for 36″ height table. Hope you can help????
FYI my table will be 78 by 36 by 36
THANK YOU!!! So the vertical bar of the X trestle is usually 20.25” for a 30” table. So yours would need to be 26.25”! Hope that helps!
Quick question where did you get your wood, and what kind of wood was used? Did you have to rip your wood or was it already square on the edge when you purchased it? Thank you! Beautiful table, will be attempting this soon!!
Hi Noel, first of all thank you! So, yes, we always rip down the edges to make sure it’s straight as you can see in one of the pictures of Jordan doing that. Second, I linked every single piece of wood we used so if you click on any of those links, it will show you exactly what kind of wood and where we got it! Everything is from Home Depot, but I’m sure Lowes would have the same type stuff as well. Good luck building yours!!
Great tips! My wife and I saw this last night. I bought the wood today and have already cut everything to size. Tomorrow is assembly, sanding, and staining. I’m excited to put this table in our dining room! Thanks again!
Oh man that pumps me up! I’m so excited and so glad this was helpful for you 🙂
Wow this tutorial is amazing!!! Thank you so very much for sharing you and your husbands genius with the work, I literally shouted, “are you kidding Me” when I read the final cost! I figured at least $500 for the wood alone! Wow this seems so feasible! I really want to try this. I’ve been covering this almost exact design for so long, but also refuse to pay an insane price tag! Thanks!
You’re so welcome!! It was a labor of love but we are SO happy with it!
Hi, beautiful table! Quick questions – what did you do with the 2x3s to support the bread board? Do you have any photos of this?
Thank you so much! To be totally transparent, after making like 40 of these tables for other people after they saw ours (seriously haha) my husband said he actually wouldn’t do it that way again and doesn’t do it that way anymore. But he used the 2x3s kinda like half on the table and half on the breadboard to support the seam, but he only did that because he drilled the pocket screws to attach the breadboard ends from the breadboards towards the middle of the table. Now he drill them from the ends of the table towards the breadboards which is stronger because of the direction of the grain of the wood. I hope that makes sense!
Hi Carmen!
I am getting ready to build a similar table using character hardwood flooring boards (I work in the industry so have access to them for free!) for the table top and painted pine common boards for the base. I am wondering how you attached the table top to the trestles? I would love to find a way that is un-doable for future moving purposes!
Hi Emily! So sorry for my delay in responding to you. My husband attached the top from the underside of the trestles with 4.75” screws, 1-2 in each corner depending on size of table/“wings” of the trestle. When you moves, you can just remove those screws.
Hi Carmen, this is so impressive. Well done to you and your husband.
thank you so much, Arabella! This means a lot 🙂
THIS. IS. AWESOME! I love how this looks. Gonna hafta get Trent to make me something like this! Bravo!
listen if Jordan can do it who is NOT a wood worker, Trent can do it! We believe in you guys!
Oh my goodness, it’s just beautiful! You guys did such a great job! And I loved reading your post with all of the funny side comments!! 🙂
I really only write so I can throw those side comments in haha
I’ve always loved this table so I love that you found a way to build your own. Great tutorial and fantastic finished product!
Thank you so much! We are really enjoying. 🙂
LOVELY work. I wish we had room for a big dining room table because I’d absolutely attempt this. I need a she shed for my crafting supplies so we can have the dining room back, lol
hahah girrrrl that she shed is becoming more and more something I want! but we need a garage because everything is just in the middle of our floors too. WOOF.
WOW, what a knock-off!! I wish I had the space to fit this dining table into my house. Plus I love how you clamped the boards together with a strap, why didn’t I think of that. Thanks for sharing!
thank you Megan! I have to give credit to my husband for that one! 🙂
Oh my gosh amazing and it looks great in your dining room. You guys saved a ton of money and have a beautiful piece for your home. Love it!
thanks Toni!!!
Hey everyone! Here is a couple who posted a project that looks good and has plans that you can go look at. Who cares if the article doesn’t have all the details you want. We are all weekend diy warriors and we should all be getting together to help each other out. Not to criticize or put someone down that is not helpful! Carmen you guys did a wonderful job the table looks beautiful! Great job thinking and dreaming keep on making sawdust and enjoy laughing at the trolls!
You are my new favorite human. All the respect and joy to you because you’re brightened my day 🙂